Jupyter Launcher
The Jupyter launcher provides a simple interface to start Jupyter Notebook servers on the DTU HPC cluster.
Getting started
To start the launcher, go to Tools and select Jupyter launcher. You need to be logged in to access the launcher, as it will submit a job to the DTU HPC to start the server.

Here you'll see the interface with the basic options that are needed for the server:
CPUsSpecify the number of CPUs to request. A CPU (Central Processing Unit) is the core computational unit of a computer responsible for executing instructions. Requesting more than one CPU is only beneficial for tasks explicitly designed for parallel processing or multiprocessing.Memory (GB)Specify the amount of memory to request. Memory refers to the amount of RAM allocated for processing data. Requesting more memory is useful for handling large datasets or memory-intensive tasks, but unnecessary for smaller workloads. A good rule of thumb is to request memory equal to twice the size of your dataset. We recommend that you are conservative with the amount of requested memory, as requesting a large amount will leave you or others in the queue for longer - usually 8GB is enough.Wall timeSpecify the maximum run time for the server. This is the longest duration your server is allowed to run. Once the wall time is exceeded, the server will be terminated, and any unsaved changes or active kernels will be lost.Root directorySpecify the starting directory for the server. You will only have access to files and folders within and below this directory in the hierarchy. By default, it starts in your home directory at DTU, but you can enter any accessible path if you need to work outside of it.
Once you've selected your options, click Launch Jupyter Server to submit the job to the cluster. This process typically takes around 30 seconds, provided the queue isn't too busy. If it takes longer than one minute, try refreshing the page and submitting the request again. If the issue persists, please contact us for assistance.
When the server is ready, a button labeled Open Jupyter Server will appear:

Click this button to open the Jupyter interface in a new tab. If you need a server with different configurations, change your configurations and then press the Re-launch Jupyter Server button. Note, that only one instance of the Jupyter server can run at a time and the old server will be terminated by re-launching.
If you accidentally close the tab with the Jupyter session along with the launcher, you can reopen the session by clicking the button Open active Jupyter Notebook server on either the Jupyter launcher page or the HPC Cluster page:

Finishing your session
When you are finished with your Jupyter server, the session can be killed in one of two ways:
1) In the Jupyter Notebook file directory interface, select File -> Shut down

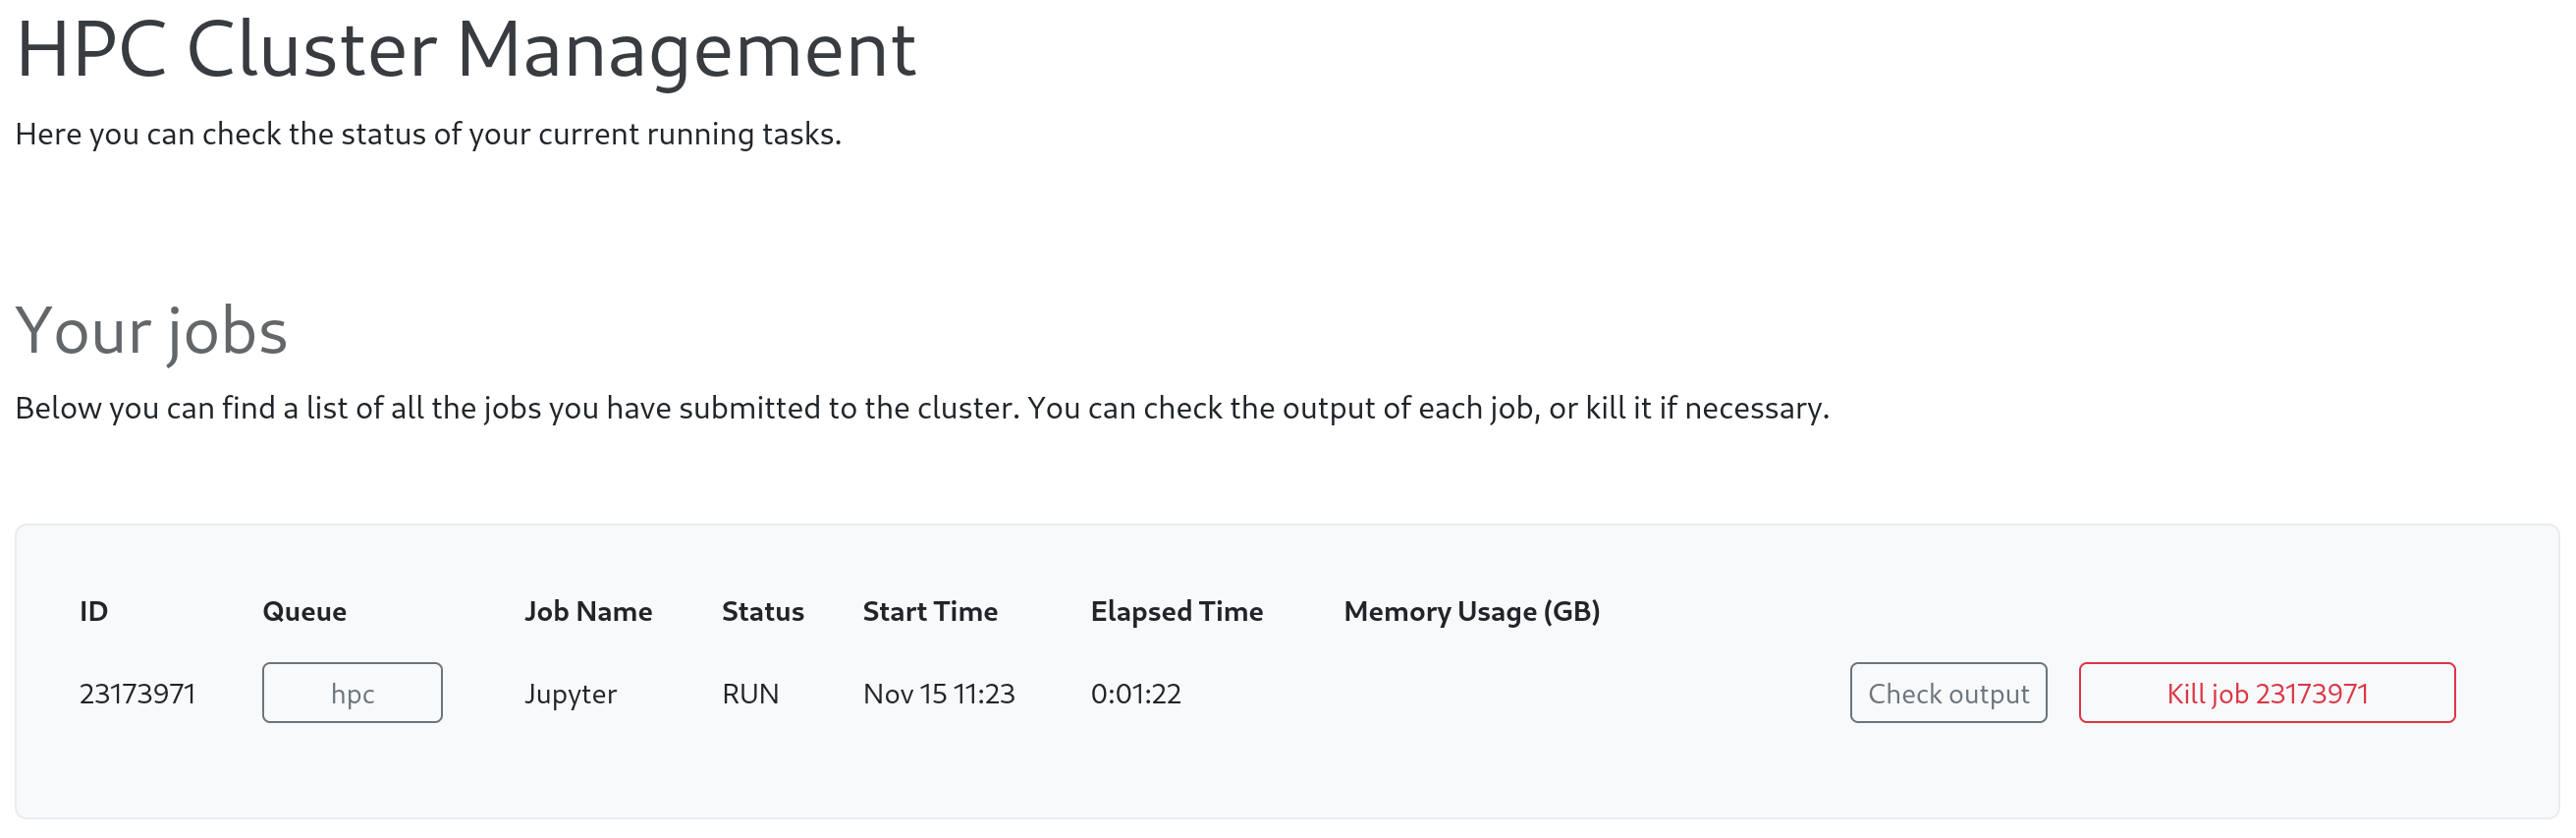
2) On the QIM platform, select HPC cluster after pressing your profile image in the top right corner. Under the header 'Your jobs' you can select "Kill job job-number".
Detailed configuration
To access more options regarding the Jupyter Server, press the checkmark Show detailed configuration:
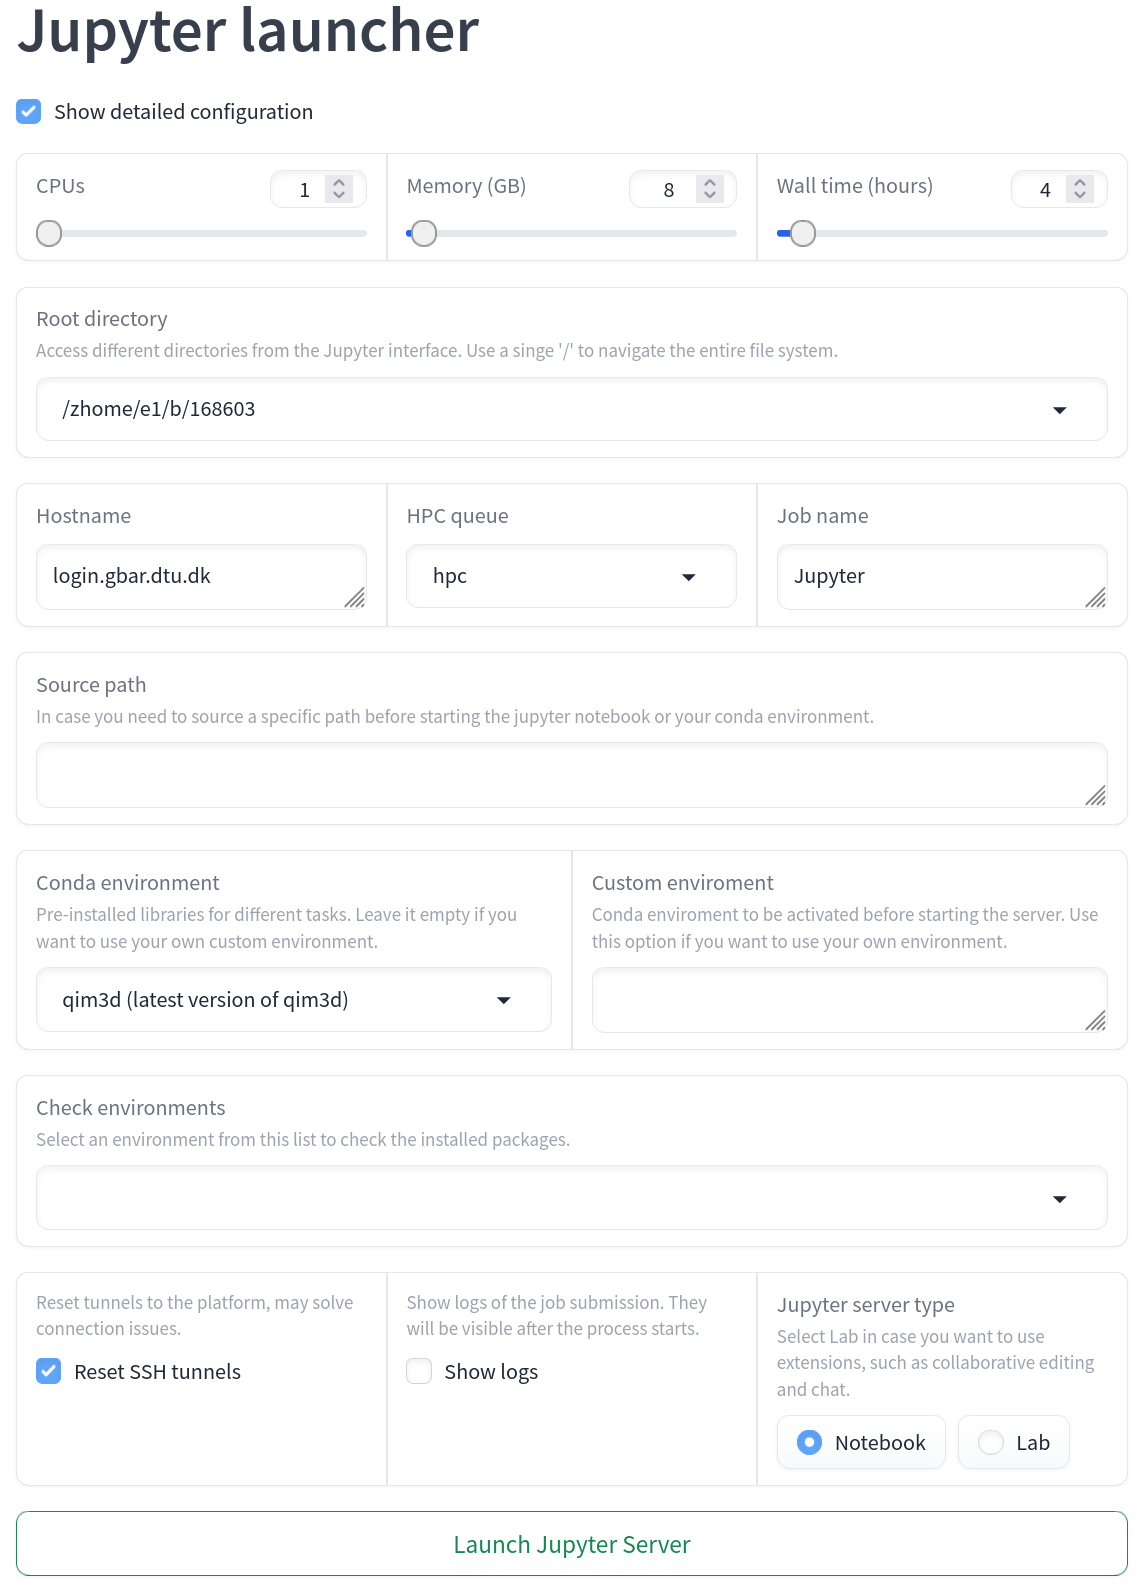
HostnameDefines the address used for SSH connections and job submissions. Change this to connect to a specific server.HPC queueDetermines what HPC queue to enter. If you also need to access to a GPU, select the appropriate node. Note that you may not have access to all the listed HPC queues.Job nameProvides a name for the submitted job. Change this if you need a more descriptive or specific name.Conda environmentSpecifies the name of a pre-installed Conda environment to activate. Leave this blank to use a custom environment.Check environmentSelects a pre-installed environment to see a list of installed packages. These will be shown below the "Launch Jupyter Server" button.Source pathDefines a path to source a custom environment. For example, the default qim3d environment accesses the source path: "/dtu/3d-imaging-center/QIM/conda/miniconda3/bin/activate". This field should be left blank if a Conda environment is selected in the "Conda environment" dropdown.Load modulesDefines what modules to load using 'module load'. This could e.g. be python3, if that is needed to initialize the custom Python environment.Environment activationSpecifies how the selected environment should be activated.Custom environment nameSpecifies the name of the custom Conda environment to activate. This activation will occur after the source path is sourced. For example, entering "qim3d" here will run 'conda activate qim3d' in the terminal if the environment activation is set to 'conda activate'.Reset SSH tunnelsDefines if SSH tunnel should be reset. By default, the SSH tunnel between the cluster node and the platform is reset each time a new server is launched. If you experience connection issues, try unchecking this box to see if it resolves the problem.Jupyter server typeDefines if the created session activates a Jupyter Notebook or JupyterLab.Show logsEnables visibility of logs from the Jupyter Server. The logs will appear after a job is submitted.
Logs
The logs provide detailed information that is updated throughout the session. Here, you'll find additional information about the job script, requested resources, and the node where the server is running. If you're experiencing connection issues, check the logs for useful debugging information that might help resolve the problem.

Loading configuration from the URL
When starting a Jupyter Notebook server with a detailed configuration, sometimes many small changes are needed. In order to save time when using a similar configuration multiple times, it's possible to load the configuration using the URL. To do this, a prefix must be added when connecting to the Jupyter Launcher.
The usual URL for the Jupyter Launcher is https://platform.qim.dk/tools/jupyter-launcher.
If you want to preload a configuration, add ? to indicate that the following piece of the URL are configuration arguments and follow that with the specific configuration you wish to preload. An example could be:
https://platform.qim.dk/tools/jupyter-launcher?cpus=4.
This will preload the Jupyter Launcher with the selection of 4 CPUs. When more configurations are needed, add & between following arguments to separate them. For instance:
https://platform.qim.dk/tools/jupyter-launcher?cpus=4&mem=32
will configure a launcher with 4 CPUs and 32 GB memory.
All the arguments are as follows:
- cpus: Number of CPUs that will be requested.
https://platform.qim.dk/tools/jupyter-launcher?cpus=2 - mem: Amount of memory requested in GB.
https://platform.qim.dk/tools/jupyter-launcher?mem=16 - walltime: Max runtime of Jupyter Server in hours.
https://platform.qim.dk/tools/jupyter-launcher?walltime=8 - rootdir: Root directory of Jupyter server.
https://platform.qim.dk/tools/jupyter-launcher?rootdir=/dtu/3d-imaging-center/projects/2024_QIM_platform/analysis/ - hostname: Host for job submission.
https://platform.qim.dk/tools/jupyter-launcher?hostname=login.hpc.dtu.dk - queue: Queue for the Jupyter job sumbmission.
https://platform.qim.dk/tools/jupyter-launcher?queue=gpua100 - name: Job name for job submission.
https://platform.qim.dk/tools/jupyter-launcher?name=MyJupyterSession - qim_env: QIM conda environment. Should be qim3d, env-viz or dvc-spam (or 'qim3d (latest version of qim3d)' or 'env-viz (data visualization tasks)' or 'dvc-spam (Software for the Practical Analysis of Materials)') or the launch will result in an error.
https://platform.qim.dk/tools/jupyter-launcher?qim_env=dvc-spam - source: Source path for custom environment.
https://platform.qim.dk/tools/jupyter-launcher?source=/dtu/3d-imaging-center/QIM/conda/miniconda3/bin/activate - module: Use semicolons to separate multiple modules.
https://platform.qim.dk/tools/jupyter-launcher?module=python3;gcc - activator: Method for custom environment activation.
https://platform.qim.dk/tools/jupyter-launcher?activator=conda activate - env: Name of custom environment to be activated.
https://platform.qim.dk/tools/jupyter-launcher?env=qim3d - reset_tunnels: Bool value defining if connection tunnels should be reset. Should be 0 or False if unwanted.
https://platform.qim.dk/tools/jupyter-launcher?reset_tunnels=False - jupyter_type: Should be "Lab" if Jupyter Lab is wanted. Will default to Notebook.
https://platform.qim.dk/tools/jupyter-launcher?jupyter_type=Lab
Please note, that either a default QIM environment should be specified or a custom environment (or neither, resulting in the qim3d environment). Specifying both will result in errors during launch of the Jupyter Server. This includes all specifications of the custom environment.
Below some examples of custom URLs are shown:
- Config URL running renamed jupyter notebook on GPU node with extended wall time
https://platform.qim.dk/tools/jupyter-launcher?name=Jupyter_Notebook&cpus=2&mem=16&queue=gpua100&walltime=8
- Config URL with env-viz QIM environment running on a different login node with specific root directory
https://platform.qim.dk/tools/jupyter-launcher?hostname=login2.gbar.dtu.dk&qim_env=dvc-spam&rootdir=/dtu/3d-imaging-center/projects/2024_QIM_platform/analysis/
- Config URL with custom activation of a conda environment
https://platform.qim.dk/tools/jupyter-launcher?source=/dtu/3d-imaging-center/QIM/conda/miniconda3/bin/activate&activator=conda activate&env=qim3d
- Config URL with activation of a virtual environment (assuming you have already created one) with ability to compile c files with icc
https://platform.qim.dk/tools/jupyter-launcher?module=intel&source=/path/to/venv/bin/activate
- Final URL showing examples for all the different options
https://platform.qim.dk/tools/jupyter-launcher?cpus=2&mem=16&walltime=8&rootdir=/dtu/3d-imaging-center/projects/2024_QIM_platform/analysis/&hostname=login2.hpc.dtu.dk&queue=gpua100&name=Tutorial&source=/dtu/3d-imaging-center/QIM/conda/miniconda3/bin/activate&module=gcc&activator=conda activate&env=qim3d&jupyter_type=Lab
For convenience, it can be an advantage to save the link - e.g. in a bookmark - for future use.